Project Aria Desktop Companion App
Overview
The Project Aria Desktop Companion App, provides the ability to record, transfer, process, validate and visualize Aria's data through a desktop interface. These instructions are only useful if you have Project Aria glasses.
Go to the Quickstart Guide for how to start using them.
We are no longer proactively providing credentials for the Desktop Companion App. We will shortly announce a timeline for the desktop app's deprecation. If you need to manage files or MPS requests from a local machine, we recommend using Aria Studio. If you have a strong need to use the desktop app over Aria Studio in the immediate term, please reach out to ariaops@meta.com to discuss your use case.
Features
- Handle and select between multiple plugged in Aria glasses
- Set the default recording profile for recordings initiated by the capture button or Desktop app
- Preview a live stream of Aria's sensors
- Display, extract, validate Aria VRS data
- Access Machine Perception Services (MPS), a cloud-based service to process Aria VRS data
- Visualize Aria Data as well as MPS outputs.
- Direct access to documentation and guides
Linux support for the Desktop app is limited (see requirements) and only v36 is available. Please use the MPS CLI to request Hand Tracking MPS.
Before you start - Device OS Update
Before using the Desktop app, you must use the Aria Mobile Companion App to update your Aria glasses' OS.
To install
Follow the instructions in the ARK SW Downloads and Updates page to download and install the app (this is where you'll download updates as well).
You can launch the Desktop App via GUI or command line
Windows
C:\Program Files\Aria\v3\AriaHub.exe
MacOS
/Applications/Aria.app/Contents/MacOS/AriaHub
Login
- Read the Project Aria Research Community Guidelines and select Accept
- Log in using the credentials that were sent to you (the same used to log into the Mobile Companion App).
Dashboard
After accepting the guidelines and logging in, you should see the Aria Dashboard. The dashboard displays the device info for your Aria glasses and allow you to interact with your glasses, if they are plugged in, as well as links to further information about Aria.
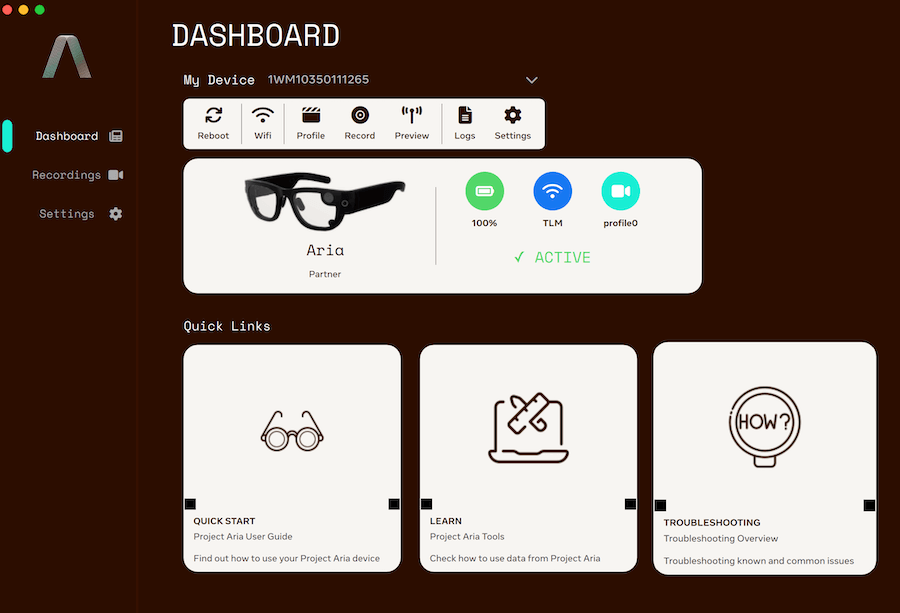
Pairing
The Desktop App will detect devices that are plugged in via USB. Once plugged in, your device will display as Aria and as Active with its serial number visible in the list of devices next to My Device.
If you cannot see your device, make sure you have updated the firmware using the Aria Mobile Companion app.
Machine Perception Services (MPS)
Through the Desktop App you can request MPS for eligible recordings.
To request MPS:
- Go to the Recordings Tab
- Select Tools
- Select Request MPS in the Recordings toolbar
Go to Request MPS for more information.
Download your data
Once you've completed recordings with your Aria Glasses you can access and download these recordings using the Desktop Companion app, if you wish.
While you can download recordings using the Desktop app, we recommend using ADB or MTP. Go to the Quickstart Guide for more information.
 Every recording will generate a VRS file and a .vrs.json file containing the recording's metadata.
To download a recording:
- Go to the Recordings page
- You'll see thumbnails of all the recordings on your Aria glasses
- Select Pull to download the data from your glasses
- In the file explorer window, select where you want to save the recording
- Once you've selected a folder location, a dialog window will pop up indicating the current VRS file transfer
Visualize your data
Once files have been copied to your local directory, the VRS file can be visualized using the Desktop App.
- In the Recordings page, select Tools
- Select Play VRS
- When the file explorer window appears, select the VRS file you want to play
- Once you've selected a file to open, the VRS player window will pop up and start playing your recording
- Once the visualizer is open, use Open (Path or URI) or Select (Explorer window) to visualize other recordings
Playback Controls
Play/pause/stop playback
The Previous and Next Frame buttons will play at most one frame backward or forward for each visible stream. The Speed controls let you chose to play slower or faster. If there is too much data for your system to process, frames will be dropped.
Overlay Selection
The overlay selector lets you chose what information to display over the frames. The options are:
- Hide - there is no overlay
- Tags - show stream tags
- Configuration, State or Data - show the metadata found in the last record.
Tooltips
To know the duration of the image data, use the tooltip found over the time display.
Note that the start and end times show the time range in which image or audio data was found.
Streams that don't contain image or audio data are ignored, and only data records from image and audio streams are considered. So if a recording contains a single image stream that has a configuration record at timestamp 0 rather than just before the first data record (as is too often the practice), while the first data record is at timestamp 15, the playback start time will be 15.
Menu Bar Commands
The Menu Bar offers functionality available only there, don't forget to look there!
The Layout menu's top section let you save and manage presets. Save your favorite stream display configurations, including stream orientation, stream order, which streams are visible or hidden, using the Save Preset command. To arrange streams, see the Context Menu section below.
The commands in the lower section let you control in how many row of how many views the streams will be arranged. Layout Frames 4x2 means using 2 rows with up to 4 streams each. The layout configurations offered depend on the number of image streams visible.
Once at least one preset has been saved, you can recall or delete presets, which automatically get a keyboard shortcut for quick access.

Keyboard Playback Controls
Playback can be directly controlled from the keyboard:
- Use the space bar to play/pause replay.
- The backspace and the home keys will reset playback to the start of the file, much like the Stop button.
- The left and right arrow keys will read at most one frame per stream, in either direction.
- The up and down arrow keys will jump at most 10 frames, in either direction.
- The page-up and page-down keys will jump at most 100 frames, in either direction.
When using the arrow keys, all frames are guaranteed to be read. Use this feature if you want to be sure to view every frame of your file.
Preview a basic visualization
You can use the Desktop app to preview sensor data from your Aria glasses stream data over Wi-Fi. This visualization does not have the capabilities of the Client SDK and you can't subscribe to the data. When using the Desktop app, we recommend only using Profiles 12 and 18, which are optimized for streaming.
To stream data, your Aria glasses need to be on the same network as your computer.
Corporate/Institution networks are often protected by many layers of security and firewalls which will impede you from streaming. If you are at home, please make sure you're not connected to a VPN.
Wi-Fi connection via Mobile Companion App
You will have connected your Aria device to Wi-Fi when you paired your device with the Mobile Companion App and updated it. Your computer and Aria device need to be on the same Wi-Fi network If you need to change the Wi-Fi network your Aria is connected to:
- Open Mobile Companion App
- In the Paired Glasses section of the Dashboard, select Select Wi-Fi
- Select your preferred network and follow the prompts to connect
- You can also forget an existing network from the Wi-Fi menu
- Make sure it is a non-corporate network that is the same as your computer
Once connected, the Wi-Fi network name will appear in the Desktop App under My Device underneath the Wi-Fi icon which will become blue.
Wi-Fi connection via Desktop App
To connect the Aria glasses to a Wi-Fi network
- Select Wi-Fi on the Dashboard device toolbar under My Device.
- Make sure it is a non-corporate network that is the same as your computer
- Select your desired network and enter its password
- Select Connect to confirm your selected network
Start Preview
To start the preview, select Preview on the Dashboard device toolbar under My Device.
The Preview window will pop up showing a data stream from your selected profile. We recommend only using Profiles 12 and 18, which are optimized for streaming.
Stop Preview
To stop the streaming preview, select Stop on the same device toolbar
You will need to effectively click on the Stop button for the data streaming to stop.
Appendix A - Recording using the Desktop app
While we recommend recording using the Capture button or Mobile Companion app, here are the instructions for recording with the Desktop Companion app
Select a Recording Profile
Before you can record using the Desktop app, you'll need to set a recording profile. You can do this via the Desktop or Mobile Companion App. To set the recording profile via Desktop app, select Profile in the device toolbar.
Whenever a profile is selected, its description will be shown underneath. Select OK to confirm your selected profile.
The profile you select will also be the profile used when you initiate recording using the capture button on your Aria device.
Start Recording
- Plug your Aria device into your computer with the provided cable.
- In the Dashboard device toolbar under My Device, select Record.
- Once the recording has started you can unplug your Aria device
Stop Recording
- Plug your Aria device into your computer
- Select Stop