Project Aria Client SDK and CLI Setup Guide
Overview
The page provides instructions about how to get started with the Project Aria Client SDK, covering:
- Hardware and software requirements
- Downloading and installing the SDK
- Installing
projectaria_client_sdkvia pip will also add the Aria CLI to your PATH
- Installing
- Running Project Aria Doctor to setup your computer and fix common issues
- Pairing your Aria Glasses
- Extracting and exploring the sample apps
Requirements
Hardware
- Project Aria glasses that have:
- Completed full device setup using the Aria Mobile Companion App
- Latest up-to-date OS
- If you want to stream over Wi-Fi, you'll need a router, such as Asus, Netgear or TP-Link, that has:
- No firewall
- Supports Wi-Fi 6
- So that the glasses can connect to the 5GHz band when streaming over Wi-Fi
The Client SDK does not currently support streaming over corporate, university or public networks. Those networks are protected by many layers of security and firewalls. We recommend using one of the recommended routers listed above to stream over Wi-Fi.
Platforms
The codebase is supported on the following platforms:
- x64 Linux distributions of:
- Fedora 36 or newer
- Ubuntu jammy (22.04) or newer
- Mac Intel or Mac ARM-based (M1) with MacOS 11 (Big Sur) or newer
Software
- A version of Python within the range of 3.9 to 3.12 (inclusive)
- Python 3 download page
- To check which version of Python 3 you have, use
python3 --version
- ADB (optional)
- In addition to the CLI, you can use ADB to interact with Aria glasses
- ADB is one of the ways that you can download Aria data
Environment Setup
Step 1: Install SDK from PyPI
Create a virtual environment
When using pip, it is best practice to use a virtual environment. This will keep all the modules under one folder and will not break your local environment. Use the following command with your version of Python3.
python3 -m venv ~/venv
Install the Client SDK and CLI
Install projectaria_client_sdk with pip
source ~/venv/bin/activate

python3 -m pip install projectaria_client_sdk --no-cache-dir
Note: If you are using Linux, install version 1.1.0 instead of the latest version:
python3 -m pip install projectaria_client_sdk==1.1.0 --no-cache-dir
Step 2: Run Project Aria Doctor utility
The Project Aria Doctor utility can help detect and resolve common issues connecting and streaming from the glasses.
Run the utility and follow the prompts to resolve any issues.
aria-doctor
If you're on MacOS and lose internet connection while streaming, run aria-doctor again.
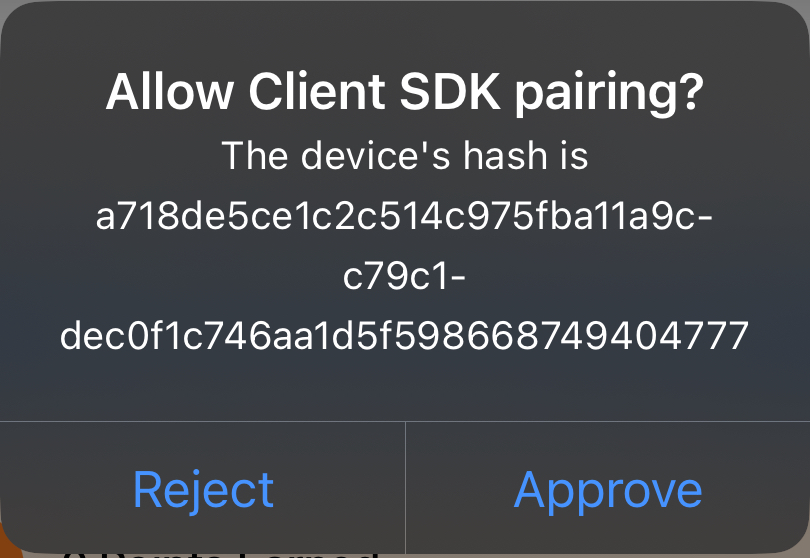
Step 3: Pair Aria Glasses with your computer
Pairing your Aria glasses to your computer allows the Client SDK and CLI to control the glasses. A pair of Aria glasses can be paired to multiple computers.
- Turn on your Aria glasses and connect it to your computer using the provided USB cable
- Open the Mobile Companion app on your phone
- On your computer, run:
aria auth pair
- A prompt should then appear in the Mobile app, tap Approve to pair your glasses
- The hash in the terminal and the app should be the same
- View (or revoke) certificates by going to Device Settings
- The Client SDK Certificate will remain valid until you manually revoke it or factory reset your glasses

At this point, you can now use the Aria CLI to interact with you Aria glasses.
Step 4: Extract and explore the sample apps
- Extract the Client SDK code samples (here to your home directory)
python -m aria.extract_sdk_samples --output ~
- Navigate to the sample folder
cd ~/projectaria_client_sdk_samples
- Install necessary dependencies:
python3 -m pip install -r requirements.txt
All code samples can be run from cd ~/projectaria_client_sdk_samples, with the exception of the Time Synchronization TICSync code samples. To use TICSync, go to cd ~/projectaria_client_sdk_samples/ticsync.
Go to Code Samples to explore Aria Client SDK features.
Go to Streaming Internals to understand how streaming works and how to configure your own streaming setup.
Go to Time Synchronization for how to create recordings with multiple Project Aria glasses.
If you encounter any issues please run aria-doctor in a separate terminal or check out troubleshooting.
You can check your Aria glasses' recording or streaming status in the Mobile Companion app.
The Client SDK does not currently support streaming over corporate, university or public networks. Those networks are protected by many layers of security and firewalls. We recommend using one of the recommended routers listed above to stream over Wi-Fi.
Useful Links
- SDK API Reference - full list of APIs
- CLI Command Reference
- SDK & CLI Troubleshooting