Project Aria Glasses Quickstart
Overview
This page provides a quick overview of what to do once you have received your Project Aria glasses. To find out how to get Aria Glasses, go to projectaria.com.
Get set up
Once you've been approved and can receive your Aria glasses you will get the following emails:
- Welcome to Aria
- Contains your account details, use these for signing into the Mobile app
- [Academic Partners only] Join Project Aria Academic Partner Announcements, Feedback & Support
- Follow the prompts to join Aria's research community space where researchers and engineers at Meta and all our Academic partners can connect, ask questions, share ideas and provide support.
- See How to join the Academic Partner Workplace group for further instructions.
Get connected
Before your glasses arrive we encourage you to join the Academic Partners Workplace group. It's a great place to get the latest announcements, provide feedback, ask questions. Unboxing videos are very welcome!
Get to know your glasses
- About the Aria Research Kit
- Includes hardware requirements for using ARK apps
- Technical Specifications
- Go to the Tech Spec part of the wiki to find out about Aria capabilities, recording profiles etc
- Glasses Manual
- Information about Project Aria glasses buttons, powering on and off, the privacy switch, how to do a factory reset, LED states, etc
- Recording Profiles
- Information and guidance about recording profiles and how to create Custom Profiles
- Aria Cable Clip
- Project Aria can provide a cable to securely connect the charge cable to the glasses. This can be helpful if using a battery pack while recording
Update your glasses
You'll need to update your Aria glasses using the Mobile companion app before you can use them.
Install the Mobile companion app
Follow the instructions in the ARK SW Downloads and Updates page to download and install the app (this is where you'll download updates as well).
Pair your glasses
- Plug your glasses into power using the provided cable
- Sign into the app using your provided user name and password
- Follow the prompts to pair your glasses
- Your glasses are automatically updated when you first pair them
- Go to the Mobile app page for further information
Further updates will be queued automatically when you use your glasses via the Mobile Companion App. If you need to manually check for updates, select Device Settings and then select Check for OS Updates.
To view Device Settings
Tap the Paired Glasses info card.

Set your Default Recording Profile
You can set the default recording profile via the mobile app. Once set, this is the default profile used when recording or streaming data.
When you select New Recording in the Mobile Companion app, tap Recording profile to view sensor settings or to select a different recording profile. Recording profile options include a custom profile where you can alter which sensors are used and how.
You can change the Default Recording Profile when selecting recording profiles or from Device Settings.
Install Project Aria Tools (optional)
The MPS CLI is the preferred way to request Machine Perception Services on your data. Install Project Aria Tools via virtual environment to be able to use the MPS CLI. You can only request Multi-SLAM MPS via the CLI.
Install Client SDK and CLI (optional)
Once you've set up your glasses with the Mobile Companion app, researchers can use the Client SDK or CLI to directly interact with Aria glasses. This is particularly helpful for streaming and subscribing to sensor data.
Go to the Client SDK and CLI section for how to install the SDK and explore code samples.
Record Data
It's best to start and stop recording using the Capture button, Mobile Companion app, the CLI or SDK.
General recording principles
- If you start recording with one method, you can stop recording using a different method
- Please allow a few seconds before the recording starts. You'll know recording has started when the Recording LEDs turn on
- The recording does not stop until the Recoding LED turns off
- Because the Aria glasses need to finish indexing before the recording stops, may be a small delay between initiating the stop and the recording stopping
- The longer your glasses record for, the longer it takes a recording to stop
- This is because the larger the VRS file, the more time it takes for a recording to finish indexing.
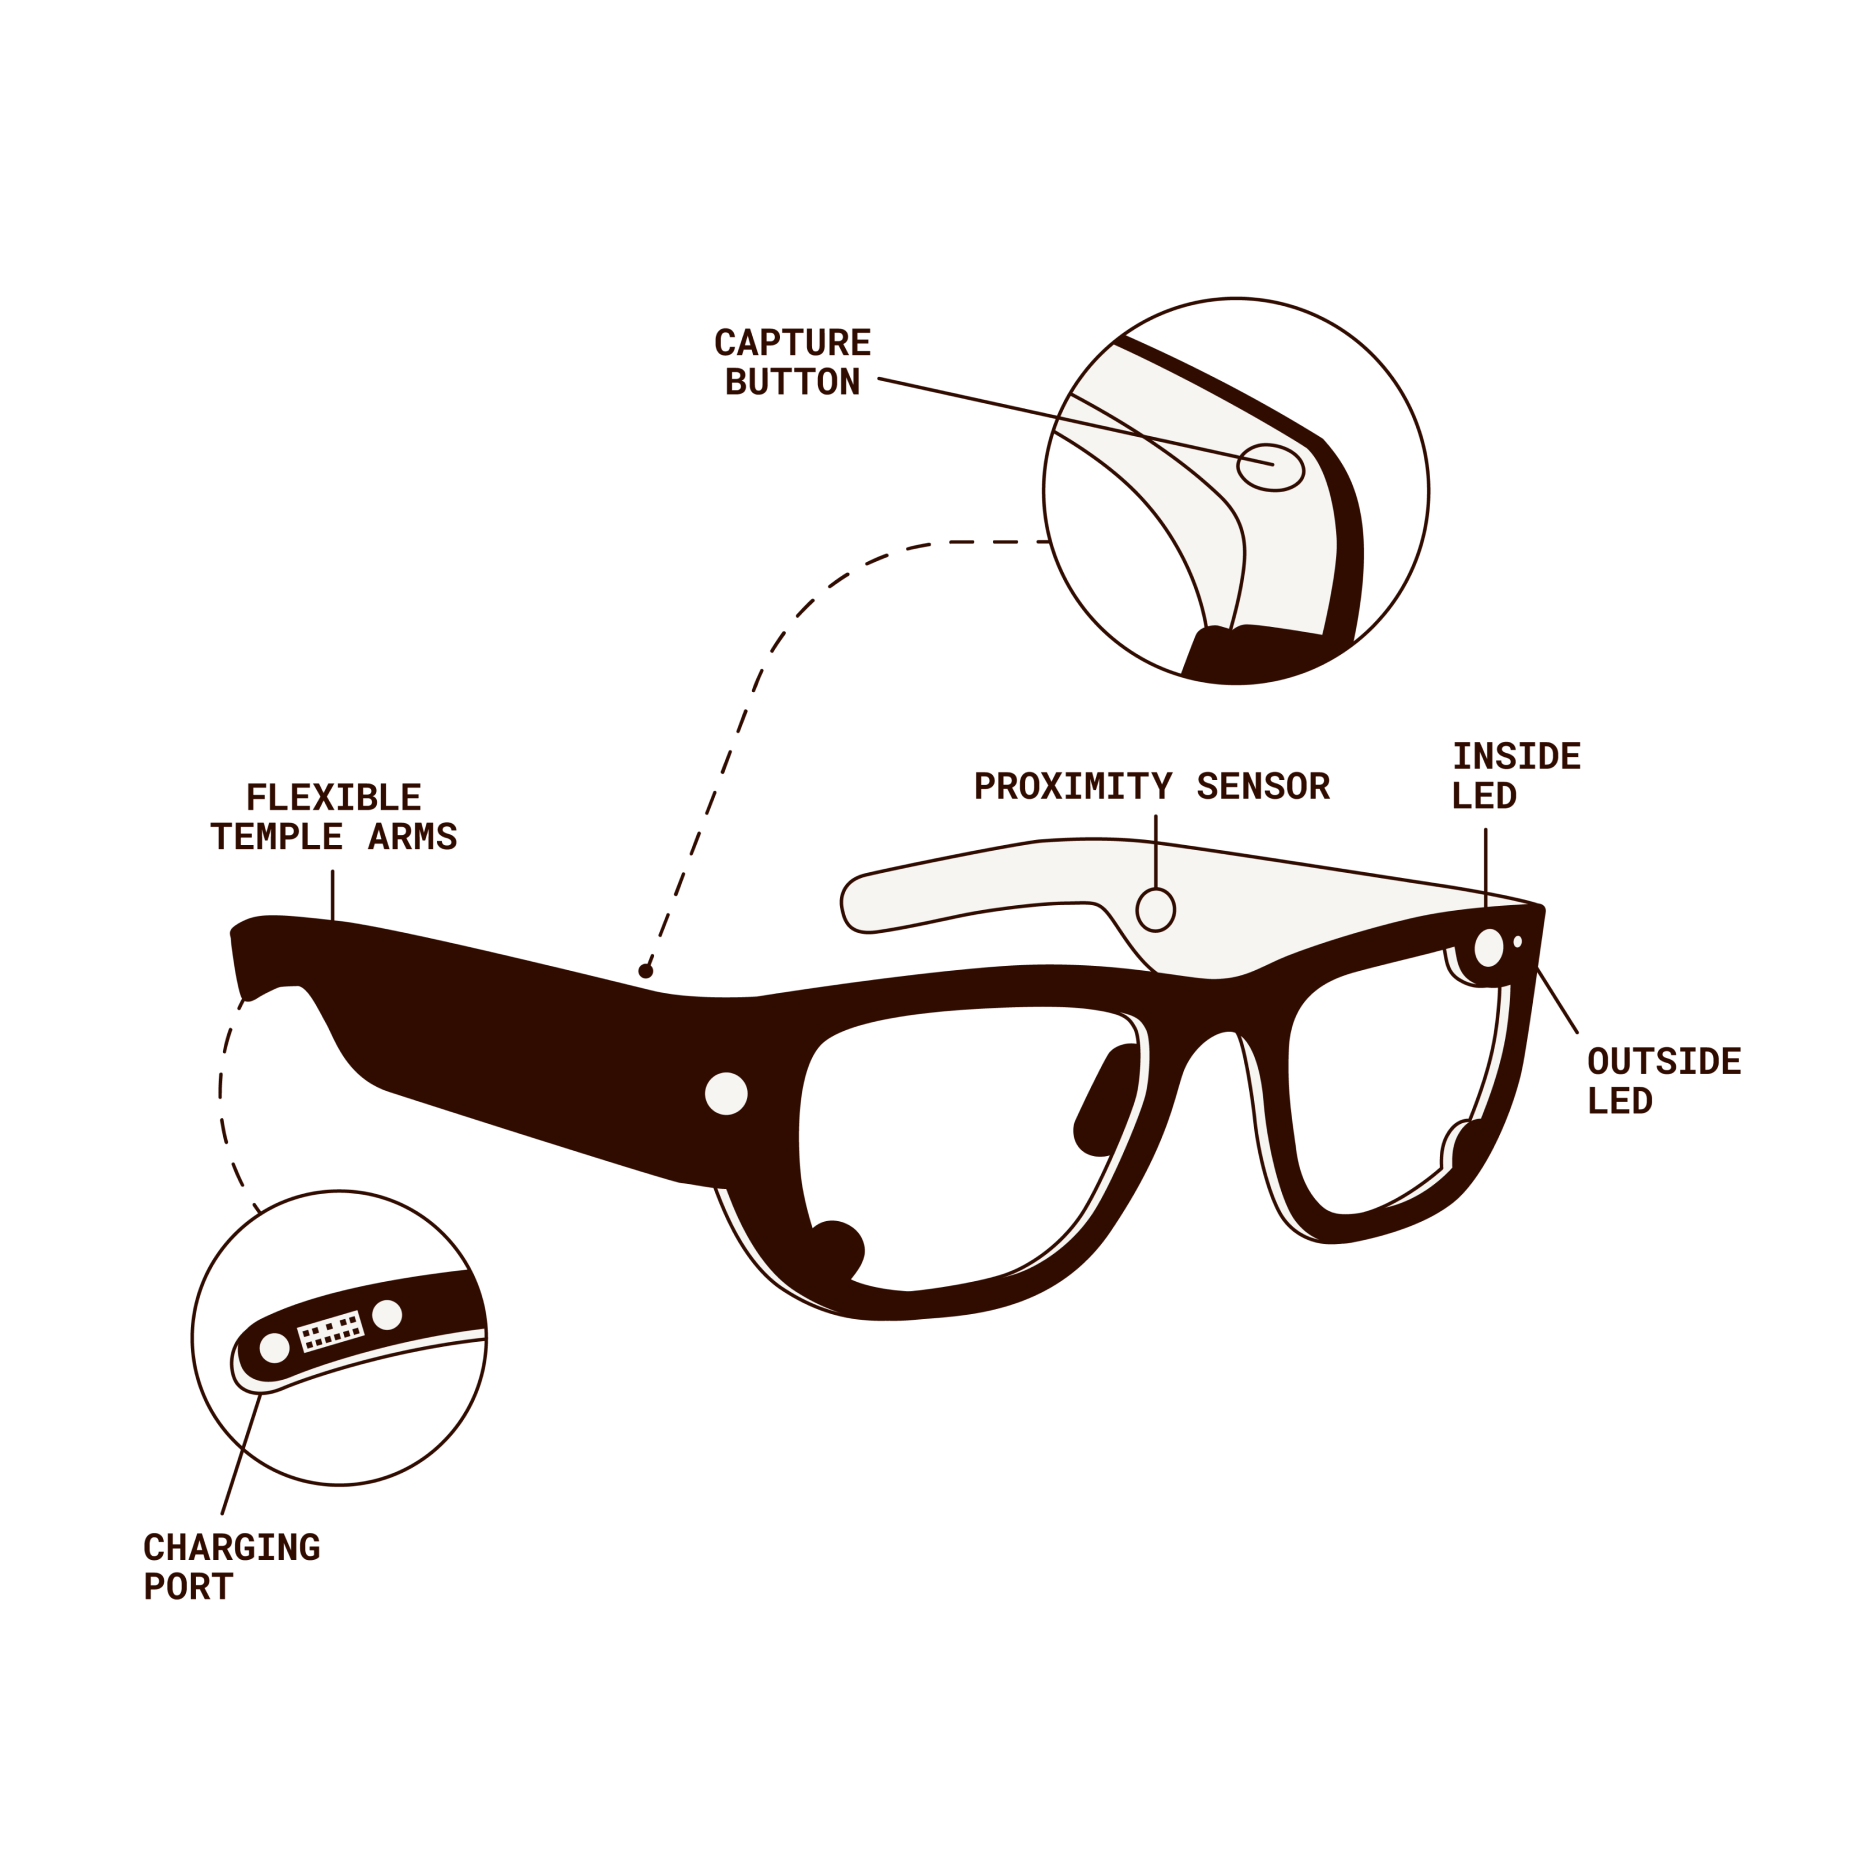
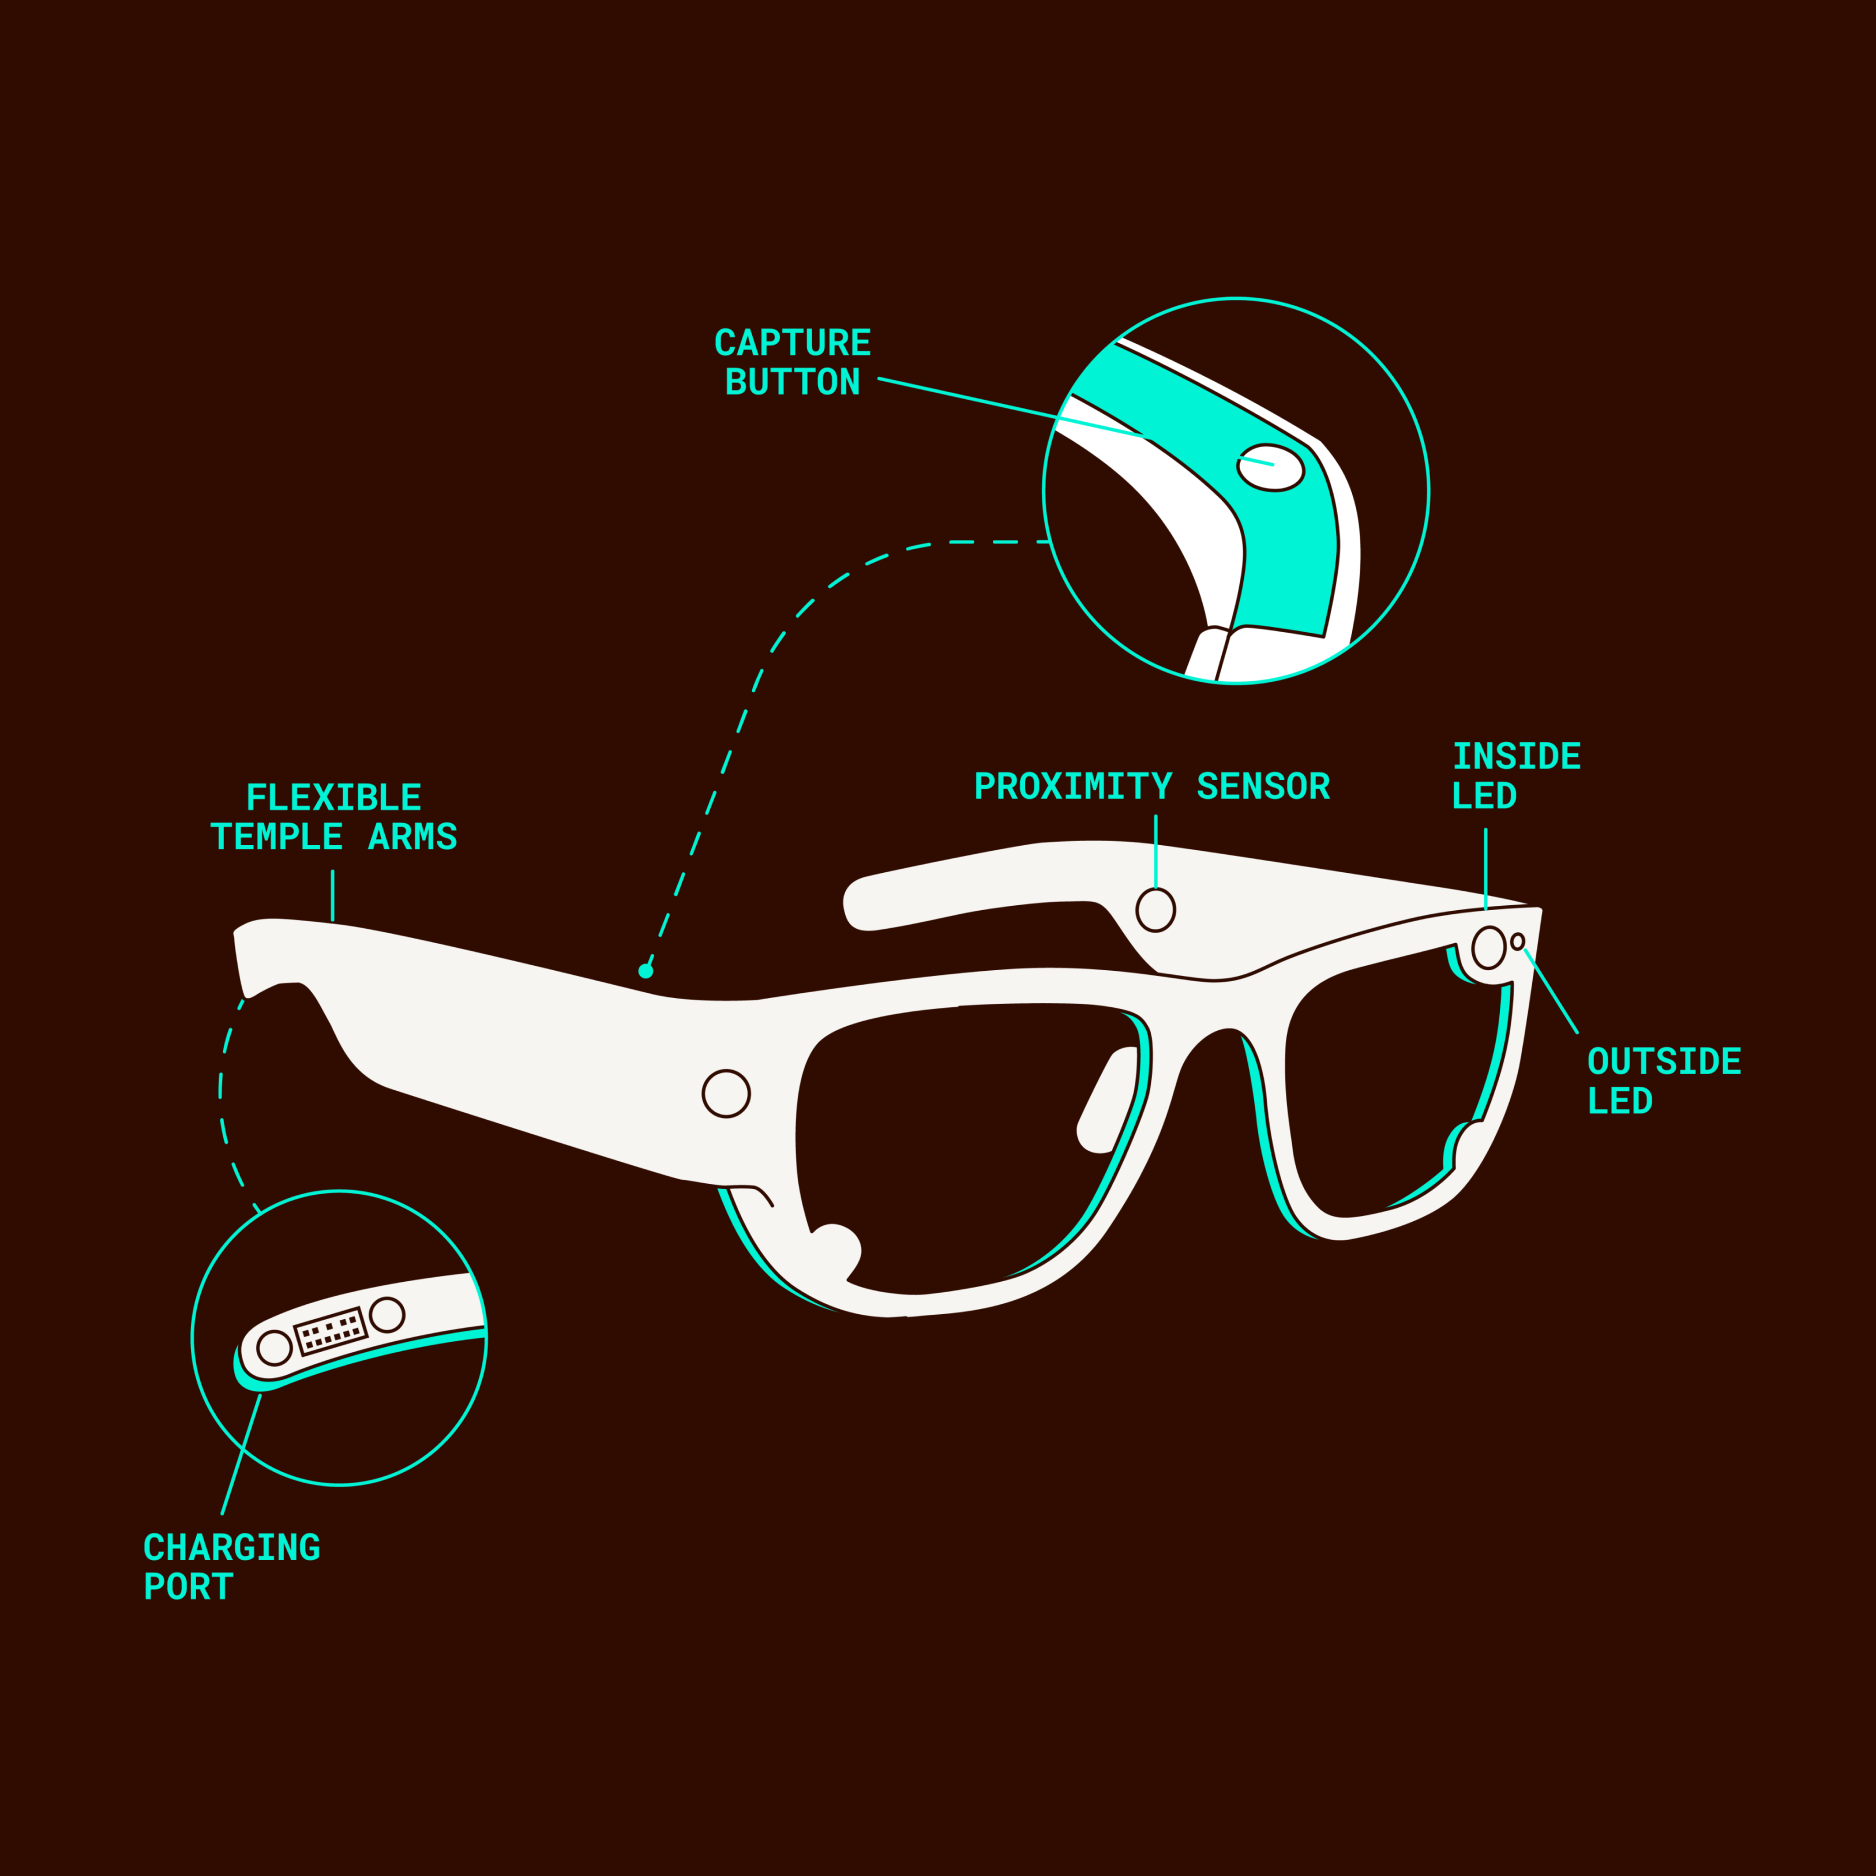
- Go to the Aria Glasses User Manual to see images of all the buttons as well as LED placement
Press the Capture button
The capture button is located on the top right of your glasses. The capture button will use the default recording profile.
- Press the capture button to start recording
- Press the capture button to stop and save the recording
Engaging the privacy switch instead of the Capture button will stop the recording and discard your recording. Discarded recordings cannot be retrieved.
Mobile Companion app
- Select New Recording Session in the Aria Dashboard to start recording
- Select Stop Recording in the app
- Go to the Mobile Companion App page for more information
You can alter the Name and Notes of a recording by going to the Recordings menu, selecting a recording and then selecting Edit.
Download data
Aria recordings are stored as a VRS file and an accompanying JSON file that includes the recording's metadata. Metadata includes:
- The name and description of the recording as shown in the Mobile Companion App
- The recording profile used
- What version of the Mobile Companion App was used to create the recording
Aria recordings are directly accessible from the glasses' storage. There are three ways you can download data to your local machine using:
- MTP
- ADB commands
We recommend using MTP for a faster download experience.
Use MTP via File Explorer
Windows & Linux
When you plug in your Aria glasses to your computer, you can navigate to it as if it were any other USB external storage device.
- Plug your Aria glasses into your computer, using the supplied cable
- Please allow a few minutes for your glasses to be detected
- Your glasses will appear in your directory as an external drive called “Aria”
- Select Aria and then go to Internal Storage > recording
- In this folder you will see the .vrs file and .json file that stores the .vrs files' metadata
- You'll also see a thumbnails folder, which contains the thumbnails that are used to provide previews of your content in the Mobile app
- Copy the data to local storage
MacOS
MTP is not provided natively on MacOS, but there are lightweight tools that you can use, such as OpenMTP.
- Download and install OpenMTP
- Connect your Aria glasses to your computer
- Open OpenMTP
- Drag & drop Aria recordings from Aria's internal storage
Use ADB
Android Debug Bridge (adb) is a command line tool that can be used with Aria glasses.
To download all your data:
adb pull /sdcard/recording /home/unixname/MyVRSFolder
To download a single VRS file
adb pull /sdcard/recording/myVrsFile.vrs /home/unixname/MyVRSFolder/
To download a single metadata file
adb pull /sdcard/recording/myVrsFile.json /home/unixname/MyVRSFolder/
Streaming
Install the Client SDK to stream Aria data.
Access basic visualization
When streaming data, we recommend only using Profiles 12 and 18, which are optimized for streaming.