Recording Control
The ClientSDK provides comprehensive CLI tools to manage recordings on your Aria Gen2 device. You can start and stop recordings, list available recordings, get detailed information, download recordings to your local machine, and delete recordings from the device.
Prerequisites
- Client SDK installed and virtual environment activated
- Device authenticated with your PC
- Device connected via USB
Before using any recording commands, you must authenticate your device by running aria_gen2 auth pair (see Device Authentication). This only needs to be done once per device-PC combination, but all recording and streaming operations will fail without it. You can verify your authentication status at any time with aria_gen2 auth check.
To orchestrate recordings across two or more connected devices in one command, see Multi-Device Recording & Streaming.
Available Recording Profiles
Before starting a recording, you need to select a recording profile that defines the sensor configuration, data rates, resolutions, and encoding formats. Project Aria Gen2 offers several pre-defined profiles:
- profile8: General purpose recording profile - Recommended for most use cases with balanced sensor configuration
- profile9: General purpose streaming profile - Optimized for real-time streaming with lower bandwidth
- profile10: Recording profile with RGB 3MP 30Hz - Higher quality RGB capture for detailed visual data
- mp_streaming_demo: Streaming profile for visualization - Optimized for real-time streaming visualization
You can also create custom recording profiles to define your own sensor configurations. For detailed specifications of each profile including sensor rates, resolutions, and encoding formats, visit the Profiles Technical Specification page.
Recording Commands
Start Recording
Start a new recording on your Aria Gen2 device with a specified profile and optional recording name.
aria_gen2 recording start --profile <profile_name> --recording-name <name>
Parameters:
--profile(required): The recording profile to use (e.g.,profile8,profile9,profile10)--recording-name(optional): A custom name for the recording (default: timestamp-based name)
Example:
# Start recording with profile8 and a custom name
aria_gen2 recording start --profile profile8 --recording-name my_experiment_01

# Start recording with profile10 for high-quality RGB capture
aria_gen2 recording start --profile profile10 --recording-name high_res_capture
Choose the profile based on your research needs. Use profile8 for general-purpose recording with all sensors enabled, or profile10 if you need higher resolution RGB data at 30Hz.
Stop Recording
Stop the currently active recording on the device.
aria_gen2 recording stop
The recording will be automatically saved on the device with a unique UUID that you can use to reference it later.
List Recordings
List all recordings stored on the device. This command displays the UUID, name, timestamp, and size of each recording.
aria_gen2 recording list
Example:
# List all recordings on the device
aria_gen2 recording list

# Expected output
[AriaGen2Cli:App][INFO]: Setting up connection to device ...
[AriaGen2Cli:App][INFO]: Connected to device 1M0YCB5G9W002M
[AriaGen2Cli:App][INFO]: Listing recordings...
[RecordingClientWrapper][INFO]: Start time                Recording uuid                         Size (bytes)   Type
[RecordingClientWrapper][INFO]: 2025-10-12 16:51:16 PDT   4b5d47d4-f1e4-46d6-b852-670adae9d848         11724800 prototype
Use this command to find the UUID of the recording you want to download or delete.
Get Recording Information
Get detailed information about a specific recording using its UUID.
aria_gen2 recording info -u <uuid>
Parameters:
-uor--uuid(required): The UUID of the recording
Example:
# Get information about a specific recording
aria_gen2 recording info -u 12345678-1234-5678-1234-567812345678
Download Recording
Download a specific recording from the device to your local machine. The recording is downloaded in VRS format.
aria_gen2 recording download -u <uuid> -o <output_directory>
Parameters:
-uor--uuid(required): The UUID of the recording to download-oor--output(optional): The output directory where the recording will be saved
Example:
# Download a recording to the Downloads folder
aria_gen2 recording download -u 12345678-1234-5678-1234-567812345678 -o ~/Downloads/

# The file will be saved as ~/Downloads/<recording_name>.vrs
Downloaded recordings are in VRS format. You can visualize them using the aria_rerun_viewer tool (see Visualizing Recordings below).
Download All Recordings
Download all recordings from the device to your local machine. Each recording will be named with its UUID.
aria_gen2 recording download-all -o <output_directory>
Parameters:
-oor--output(optional): The output directory where recordings will be saved
Example:
# Download all recordings to the Downloads folder
aria_gen2 recording download-all -o ~/Downloads/

# Files will be saved as ~/Downloads/<uuid>.vrs
This command will download all recordings on the device, which may take considerable time depending on the number and size of recordings.
Delete Recording
Delete a specific recording from the device to free up storage space.
aria_gen2 recording delete -u <uuid>
Parameters:
-uor--uuid(required): The UUID of the recording to delete
Example:
# Delete a specific recording
aria_gen2 recording delete -u 12345678-1234-5678-1234-567812345678
This action is irreversible. Make sure you have downloaded the recording before deleting it if you need to keep the data.
Delete All Recordings
Delete all recordings from the device to free up storage space.
aria_gen2 recording delete-all
Example:
# Delete all recordings from the device
aria_gen2 recording delete-all
This action is irreversible and will delete ALL recordings on the device. Make sure you have downloaded all necessary recordings before using this command.
Complete Workflow Example
Here's a typical workflow for recording, downloading, and visualizing data:
# 1. Start a recording with profile8
aria_gen2 recording start --profile profile8 --recording-name my_research_session

# 2. Perform your research activity...
# (Let the recording run while you collect data)

# 3. Stop the recording
aria_gen2 recording stop

# 4. List recordings to find the UUID
aria_gen2 recording list

# 5. Download the recording (using UUID from step 4)
aria_gen2 recording download -u <uuid> -o ~/Downloads/

# 6. Visualize the recording
aria_rerun_viewer --vrs ~/Downloads/my_research_session.vrs

# 7. (Optional) Delete the recording from the device to free up space
aria_gen2 recording delete -u <uuid>
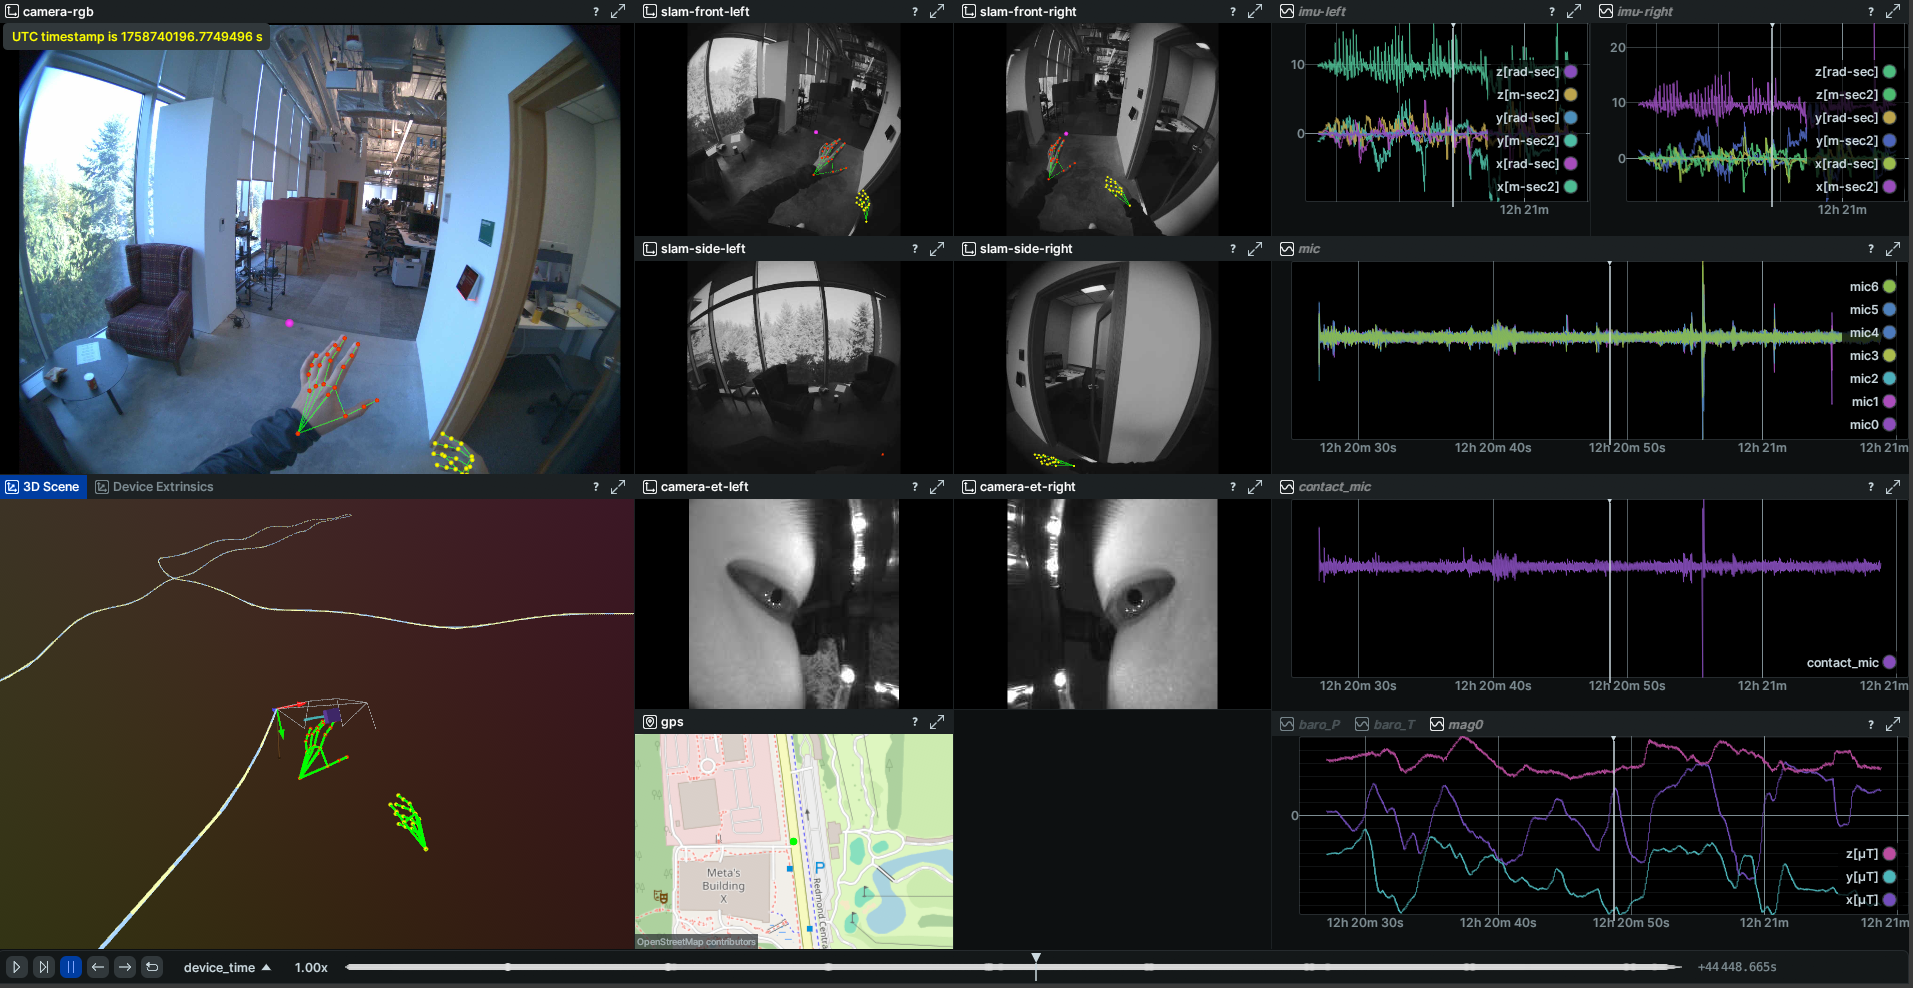
Visualizing Recordings
After downloading a recording, you can visualize it using the viewer.
aria_rerun_viewer --vrs ~/Downloads/<recording_name>.vrs
For more details of this VRS visualization tool, visit Project Aria Tools viewer
The viewer provides an interactive visualization of all sensor streams including cameras, IMU data, eye tracking, and more.
Example Visualization
Advanced features
Custom Recording Profiles
In addition to the pre-defined profiles, you can create and use custom recording profiles to define your own sensor configurations, data rates, tailored to your specific research needs.
Using a Custom Profile:
aria_gen2 recording start --json-profile <path_to_custom_profile.json> --recording-name <name>
Best Practices
- Choose the right profile: Select the profile that matches your research needs. See the Profiles Technical Specification for detailed comparisons
- Name your recordings: Use descriptive recording names to easily identify recordings later
- Monitor storage: Regularly download and delete recordings to avoid running out of storage space on the device
- Verify recordings: Use
aria_gen2 recording listto verify recordings were saved correctly before deleting them - Download before deleting: Always download recordings before deleting them from the device to prevent data loss
Next Steps
- Learn about Streaming to capture real-time data from your device
- Explore the Python SDK for programmatic control
- Review Recording Examples for advanced use cases
- Check the CLI Technical Specs for all available commands and options