Aria Gen 2 Glasses Manual
Sensors
Aria Gen2 introduces a state-of-the-art sensor suite that expands the range of research applications:
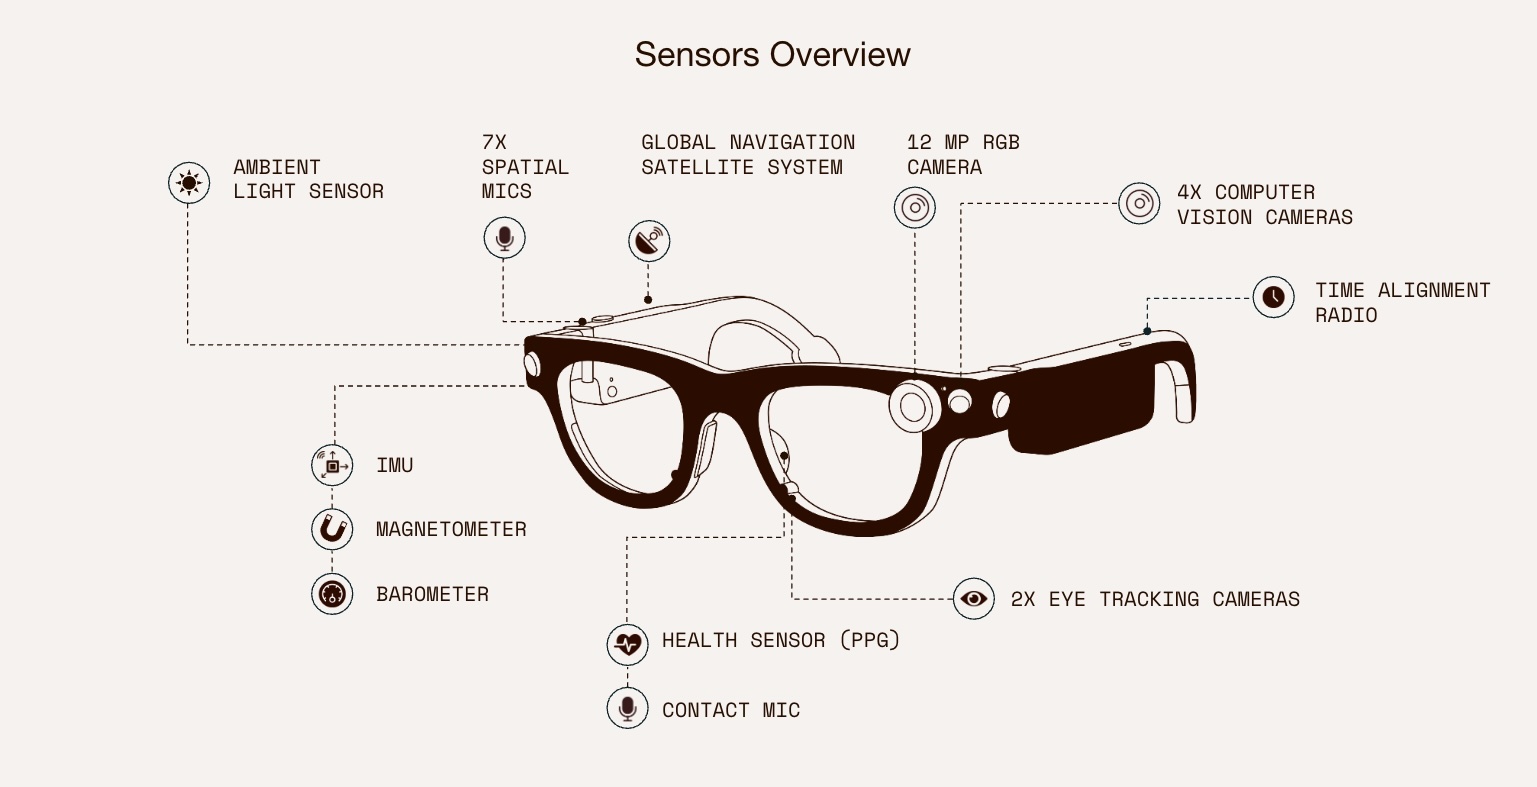
- CV Cameras: Four computer vision (CV) cameras provide a wide field of view and high-dynamic-range (HDR) imaging, enabling robust scene understanding and perception even in challenging lighting conditions.
- RGB Camera: RGB point-of-view (POV) camera for high-resolution egocentric vision and ML applications
- Eye Tracking system: Enable precise gaze estimation and user intent modeling.
- Spatial Microphones: Capture high-fidelity audio for spatial awareness and voice interaction.
- Contact Microphone (Nosepad): Isolates the wearer’s voice from bystanders, improving voice command reliability in noisy environments.
- IMU, Barometer, Magnetometer, GNSS: Support accurate localization, motion tracking, and environmental sensing.
- Ambient Light Sensor (ALS) with UV Channel: Distinguishes between indoor and outdoor lighting, opening new avenues for context-aware research.
- PPG Sensor (Nosepad): Measures heart rate, supporting physiological and affective computing studies.
- Multi-device time alignment using SubGHz radio based custom protocols allow for multiple Aria Gen 2 device to align their timebases to 10’s of microseconds accuracy.
These new sensors, especially the ALS with UV channel, contact-mics and the physiological sensors in the nosepad, unlock research opportunities in context-aware computing, health monitoring, and robust multimodal perception.
For details, see the Hardware Specifications.
Hardwares
Aria Gen 2 glasses are equipped with a suite of hardware controls, visual indicators, and audio feedback to help you operate and understand the device’s status.
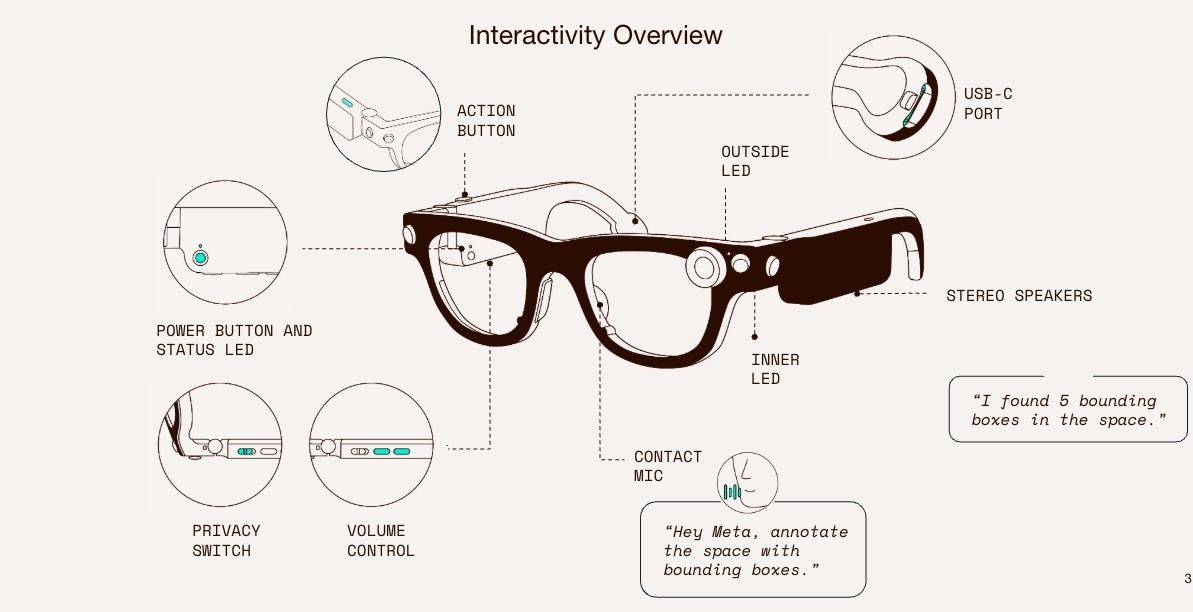
Controls and Hardware Features
The glasses include several built-in controls:
- Privacy Switch: Controls whether the device can record data. When set to the rear and the red underneath is visible, recording is disabled and any ongoing recordings are deleted.
- Action Button: Starts and ends recording sessions. This button can be customized to perform other actions (e.g., start a livestream).
- Power Button: Turns the device on and off.
- USB Port: Uses a standard USB-C cable.
- Volume Control: Adjusts the speaker volume.
Visual and Audio Indicators
Aria Gen 2 uses LEDs and speakers to communicate device status to both the wearer and bystanders.
LED Indicators
There are three main LEDs:
- Inner LED: Visible only to the wearer, primarily communicates device state and events.
- Bystander LED: Visible to bystanders, indicates when the device is recording or streaming data from sensors.
- Power LED: Located above the power button on the inner right arm, indicates battery and charging status (not visible while wearing).
Audio Feedback
- Earcons: Non-verbal sounds (e.g., camera shutter, error beeps) indicate device states.
- TTS (Text-to-Speech): Spoken messages (e.g., “Glasses shutting down”, “Battery ten percent: charge soon”) provide status updates.
Device States and Indicators
The following table summarizes how Aria Gen 2 communicates its various states:
| Inward LED | Power LED | Outward LED | Device Status Explanation |
|---|---|---|---|
| Off | Off | Off | Device is off or in standby |
| Off | Solid blue | Off | Battery charging or fully charged (system running) |
| Off | Solid orange | Off | Fastboot mode |
| Off | Blinking red | Off | Low battery if powering on or charging |
| Off | Solid blue (1s) | Off | Status check (short-press power button) |
| Off | Pulsing blue | Off | System shutting down (with earcon) |
| Pulsing green | Off | Off | Uploading |
| Solid green (3s) | Solid blue (3s) | Off | Boot complete (both LEDs solid for 3s, then off if not charging) |
| Blinking orange (4x) | Off | Off | Warning: battery low (20%), thermal throttling, low storage, or other warning |
| Blinking red (4x) | Off | Off | Error: battery critical (5%) or other error |
| Solid white (1s) | Off | Off | Device On Notification (DON): user puts on glasses, earcon plays |
| Pulsing white | Off | Off | System warm booting (waking from sleep) |
| Blinking white, then solid white | Off | Blinking white (2x), then solid white | Recording/Streaming active: inward LED blinks then solid; outward LED blinks then solid |
| Pulsing white | Pulsing blue | Off | OS booting up |
Power and Charging
Only use a USB-C cable to charge your glasses. When first plugged in, a red flashing light inside the right arm indicates the battery is 5% but charging.
To turn the device on, press and hold the power button for 3 seconds. When booting is complete, the power LED will turn solid blue for 3 seconds before fading. You can also turn on your glasses by plugging them into a power source; wait for the blue LED before disconnecting the charger.
To turn the device off, hold the power button for 3 seconds and release it. The blue LED will start blinking and then turn off after a short delay, and you will hear an earcon confirming shutdown.
Resetting the Device
Force Reset
A force reset immediately reboots your device, preserving all data. Use this if the device is unresponsive.
- Toggle the privacy switch forward (orange not visible).
- Hold both the action and power buttons for 3 seconds.
- Wait for the device to reboot.
Factory Reset
A factory reset erases all local data, including recordings.
- Toggle the privacy switch to the rear (orange visible).
- Tap (do not hold) the power and action buttons simultaneously.
- The device will reboot and the status LED will flash blue.
- The device is now ready to be paired.
Warning: Factory reset will delete all local data.