Streaming Control
The ClientSDK provides powerful streaming capabilities that allow you to receive real-time data from your Aria Gen2 device. You can stream sensor data including camera feeds, IMU data, eye tracking, hand tracking, and machine perception outputs.
Prerequisites
- Client SDK installed and virtual environment activated
- Device authenticated with your PC
- Device connected via USB (required to start/stop streaming, even for wireless methods)
Before using any streaming commands, you must authenticate your device by running aria_gen2 auth pair (see Device Authentication). This only needs to be done once per device-PC combination, but all streaming and recording operations will fail without it. You can verify your authentication status at any time with aria_gen2 auth check.
To orchestrate streams across two or more connected devices in one command, see Multi-Device Recording & Streaming.
Overview
Streaming enables you to access real-time data from your device:
- Real-time Data Access: Receive sensor data as it's captured
- Machine Perception: Access on-device VIO (Visual Inertial Odometry), eye gaze, and hand pose data
- Live Visualization: View streaming data in real-time using the streaming viewer
- Custom Processing: Build applications that process streaming data
Available Streaming Profiles
Before starting a streaming session, you can select a streaming profile that defines the sensor configuration, data rates, and resolutions. Project Aria Gen2 offers several pre-defined profiles optimized for streaming:
- mp_streaming_demo: Default streaming profile for visualization - Optimized for real-time visualization with VIO, eye gaze, and hand pose data
- profile9: General purpose streaming profile - Balanced configuration for streaming with lower bandwidth requirements
For detailed specifications of each profile including sensor rates, resolutions, and encoding formats, visit the Profiles Technical Specification page.
Custom Streaming Profiles
In addition to the pre-defined profiles, streaming fully supports custom profiles. You can create your own streaming profile to define custom sensor configurations, data rates, and resolutions tailored to your specific research or application needs.
Using a Custom Profile for Streaming:
aria_gen2 streaming start --json-profile <path_to_custom_profile.json>
For instructions on creating custom profiles, see the Custom Profile Guide.
Custom profiles are especially useful when you need specific sensor combinations or data rates that aren't available in the pre-defined profiles. For example, you might want to stream only RGB and IMU data at higher rates for a specific computer vision application.
Choose Your Streaming Method
Select the streaming method that best fits your use case:
| Method | Best For | Pros | Cons |
|---|---|---|---|
| USB Streaming | Extended sessions, highest quality | Most reliable, no thermal issues | Requires cable connection |
| WiFi Router Streaming | Untethered development, mobility | Wireless freedom, good for demos | Thermal concerns, requires network |
| On-Device Hotspot Streaming | Field work, no network available | No external network needed | Highest thermal impact, limited duration |
| Remote Server Streaming | Dedicated processing server, distributed systems | Process on powerful remote machine | Requires network setup, TLS certificates |
New to streaming? Start with USB Streaming - it's the simplest and most reliable method.
USB Streaming
Stream data over USB connection for maximum bandwidth and reliability. This is the recommended method for getting started and for extended streaming sessions.
When to Use USB Streaming
- Extended sessions: No thermal concerns - stream as long as you need
- Highest quality: Maximum bandwidth and lowest latency
- Simple setup: Just connect and stream, no network configuration
- Development: Best for testing and development work
Quick Start
You must start streaming (aria_gen2 streaming start) before launching aria_streaming_viewer. The viewer connects to an already-active stream — if no stream is running, the viewer will not display any data. Always start streaming first, then open the viewer in a separate terminal.
# 1. Connect device via USB and verify connection
aria_gen2 device list

# 2. Start streaming (MUST be done before opening viewer)
aria_gen2 streaming start

# 3. In another terminal, visualize the stream (streaming must already be active)
aria_streaming_viewer --real-time --interpolate --rerun-memory-limit 4GB

# 4. When done, stop streaming
aria_gen2 streaming stop
USB Streaming Details
Requirements:
- Device connected via USB
- Device authenticated (see Device Authentication guide)
- High-quality USB 3.0+ cable recommended
Command:
aria_gen2 streaming start
Default Profile:
The mp_streaming_demo profile is used by default, which provides smooth visualization with VIO, eye gaze, and hand pose data. See the Profiles Technical Specification for detailed sensor configurations and frame rates for all available profiles.
USB Troubleshooting
Device Not Found:
# Check device connectivity
aria_gen2 device list

# If not found, ensure device is authenticated
aria_gen2 auth check
Common Issues:
- USB cable: Try a different high-quality USB 3.0+ cable
- USB port: Try a different USB port on your computer
- Authentication: Run
aria_gen2 auth pairif device is not authenticated - Recording active: Stop any active recording with
aria_gen2 recording stop
Wireless Streaming
Wireless streaming allows you to stream data from your Aria Gen2 device over WiFi, eliminating the need for a USB cable. This is useful for untethered development, demos, and testing in various environments.
All device controls, including starting and stopping streaming, require a USB connection. For wireless streaming:
- Connect the device via USB to start streaming
- Unplug the USB cable after streaming has started
- Plug the device back in via USB when you need to stop streaming
Wireless streaming generates more heat than USB streaming due to WiFi radio activity. You must configure message batching using the --batch-period-ms option to manage thermal performance and prevent the device from overheating (thermal throttle at 42°C).
Message Batching
The --batch-period-ms option controls how messages are batched before being sent from the device. This reduces transmission overhead and optimizes thermal performance.
How it works:
- Messages are collected and batched over the specified period (in milliseconds)
- Batched messages are sent together, reducing WiFi transmission overhead
- Higher batch periods = better thermal performance but increased latency
- The batch period represents the worst-case delay for live streaming
Trade-off:
| Batch Period | Thermal Performance | Latency | Use Case |
|---|---|---|---|
| 100ms | Poor (near thermal limit) | Low | Short demos, testing |
| 200-400ms | Moderate | Medium | General wireless use |
| 500-800ms | Good | High | Extended wireless sessions |
WiFi Router Streaming
Stream data from Aria devices connected to the same WiFi network as your development machine.
When to Use WiFi Router Streaming
- Untethered development: Move freely without cable constraints
- Demos: Show live streaming without visible cables
- Multi-room testing: Stream while moving between areas
- Sessions > 30 minutes: With appropriate batch period settings
Prerequisites
- Same network: Both Aria device and computer must be on the same WiFi network
- Network ports: Ensure streaming ports are accessible on your network (default port: 6768)
- Device connected: Connect Aria to your WiFi network via the Companion App or via CLI
Quick Start
# 1. Connect device via USB first for initial setup
aria_gen2 device list

# 2. Verify device is on WiFi (check Companion App)

# 3. Start streaming with batch period for thermal management (MUST be done before opening viewer)
#    Use 200ms batch period for a balance of latency and thermal performance
aria_gen2 streaming start --batch-period-ms 200 --interface wifi_sta

# 4. Unplug the USB cable - streaming will continue over WiFi

# 5. In another terminal, visualize the stream (streaming must already be active)
aria_streaming_viewer --real-time --interpolate --rerun-memory-limit 4GB

# 6. When done, plug the USB cable back in, then stop streaming
aria_gen2 streaming stop
Recommended Batch Periods for WiFi Router
These are preliminary testing results and may vary across environments and devices.
| Environment | Batch Period | Notes |
|---|---|---|
| Cool environment (below 25°C) | --batch-period-ms 100 | Near thermal limit, monitor closely |
| Normal room temperature | --batch-period-ms 200 | Recommended starting point |
| Warm environment (above 28°C) | --batch-period-ms 400 | More conservative for thermal safety |
With --batch-period-ms 100, we have observed the device nearly reaching thermal throttle (42°C) during WiFi router streaming. Actual thermal behavior depends on your operating environment temperature. Start with higher batch periods and reduce if you need lower latency.
On-Device Hotspot Streaming
Connect directly to Aria's built-in WiFi hotspot for standalone wireless streaming without requiring external network infrastructure.
When to Use On-Device Hotspot Streaming
- Field work: No external WiFi network available
- Quick demos: Simple setup without network configuration
- Isolated testing: When you can't access local networks
- Short sessions only: Due to high thermal impact
On-device hotspot streaming generates significant heat because the device acts as both a WiFi access point AND performs streaming simultaneously.
Even with aggressive batching (800ms), the device will overheat during extended use.
Recommendations:
- Do NOT use for sessions longer than 20 minutes
- Take breaks to let the device cool down
- Monitor device temperature closely
- Consider USB streaming for longer sessions
Prerequisites
- Enable hotspot: Enable the hotspot feature on Aria via the Companion App
- Connect computer: Connect your development machine to Aria's WiFi hotspot
Quick Start
# 1. Enable hotspot on Aria device via Companion App or CLI:
#    aria_gen2 device hotspot start

# 2. Connect device via USB to start streaming
aria_gen2 device list

# 3. Connect your computer to Aria's WiFi hotspot

# 4. Start streaming with aggressive batching for thermal management (MUST be done before opening viewer)
#    800ms batch period is recommended to extend usable time
aria_gen2 streaming start --batch-period-ms 800 --interface --wifi_sap

# 5. Unplug the USB cable - streaming will continue over WiFi hotspot

# 6. In another terminal, visualize the stream (streaming must already be active)
aria_streaming_viewer --real-time --interpolate --rerun-memory-limit 4GB

# 7. When done, plug the USB cable back in, then stop streaming
#    Stop before 20 minutes to prevent overheating
aria_gen2 streaming stop
Recommended Settings for Hotspot Streaming
These are preliminary testing results and may vary across environments and devices.
| Session Length | Batch Period | Notes |
|---|---|---|
| Under 10 minutes | --batch-period-ms 500 | Short demo, higher risk |
| 10-20 minutes | --batch-period-ms 800 | Maximum recommended duration |
| Over 20 minutes | Not recommended | Use USB streaming instead |
Hotspot Streaming Limitations
| Limitation | Impact | Mitigation |
|---|---|---|
| High thermal load | Device overheats | Limit to 20 min sessions max |
| Battery drain | Faster battery consumption | Keep device charged |
| Higher latency | 500-800ms delay | Not suitable for real-time critical applications |
| Single client | Only one device can connect | Use WiFi router for multi-client scenarios |
If you encounter issues with wireless streaming, see the Wireless Streaming Troubleshooting Guide for common solutions.
Streaming Commands Reference
For complete streaming command documentation, including all available options, see the CLI Reference - Streaming Commands.
Quick Reference:
# Start streaming (USB)
aria_gen2 streaming start

# Start streaming (WiFi with batch period)
aria_gen2 streaming start --interface wifi_sta --batch-period-ms 200

# Stop streaming
aria_gen2 streaming stop
Visualize Streaming Data
You must start streaming before launching the viewer. The viewer connects to an already-active stream — if no stream is running, the viewer will not display any data.
Open the streaming viewer in a separate terminal while streaming is active:
aria_streaming_viewer --real-time --interpolate
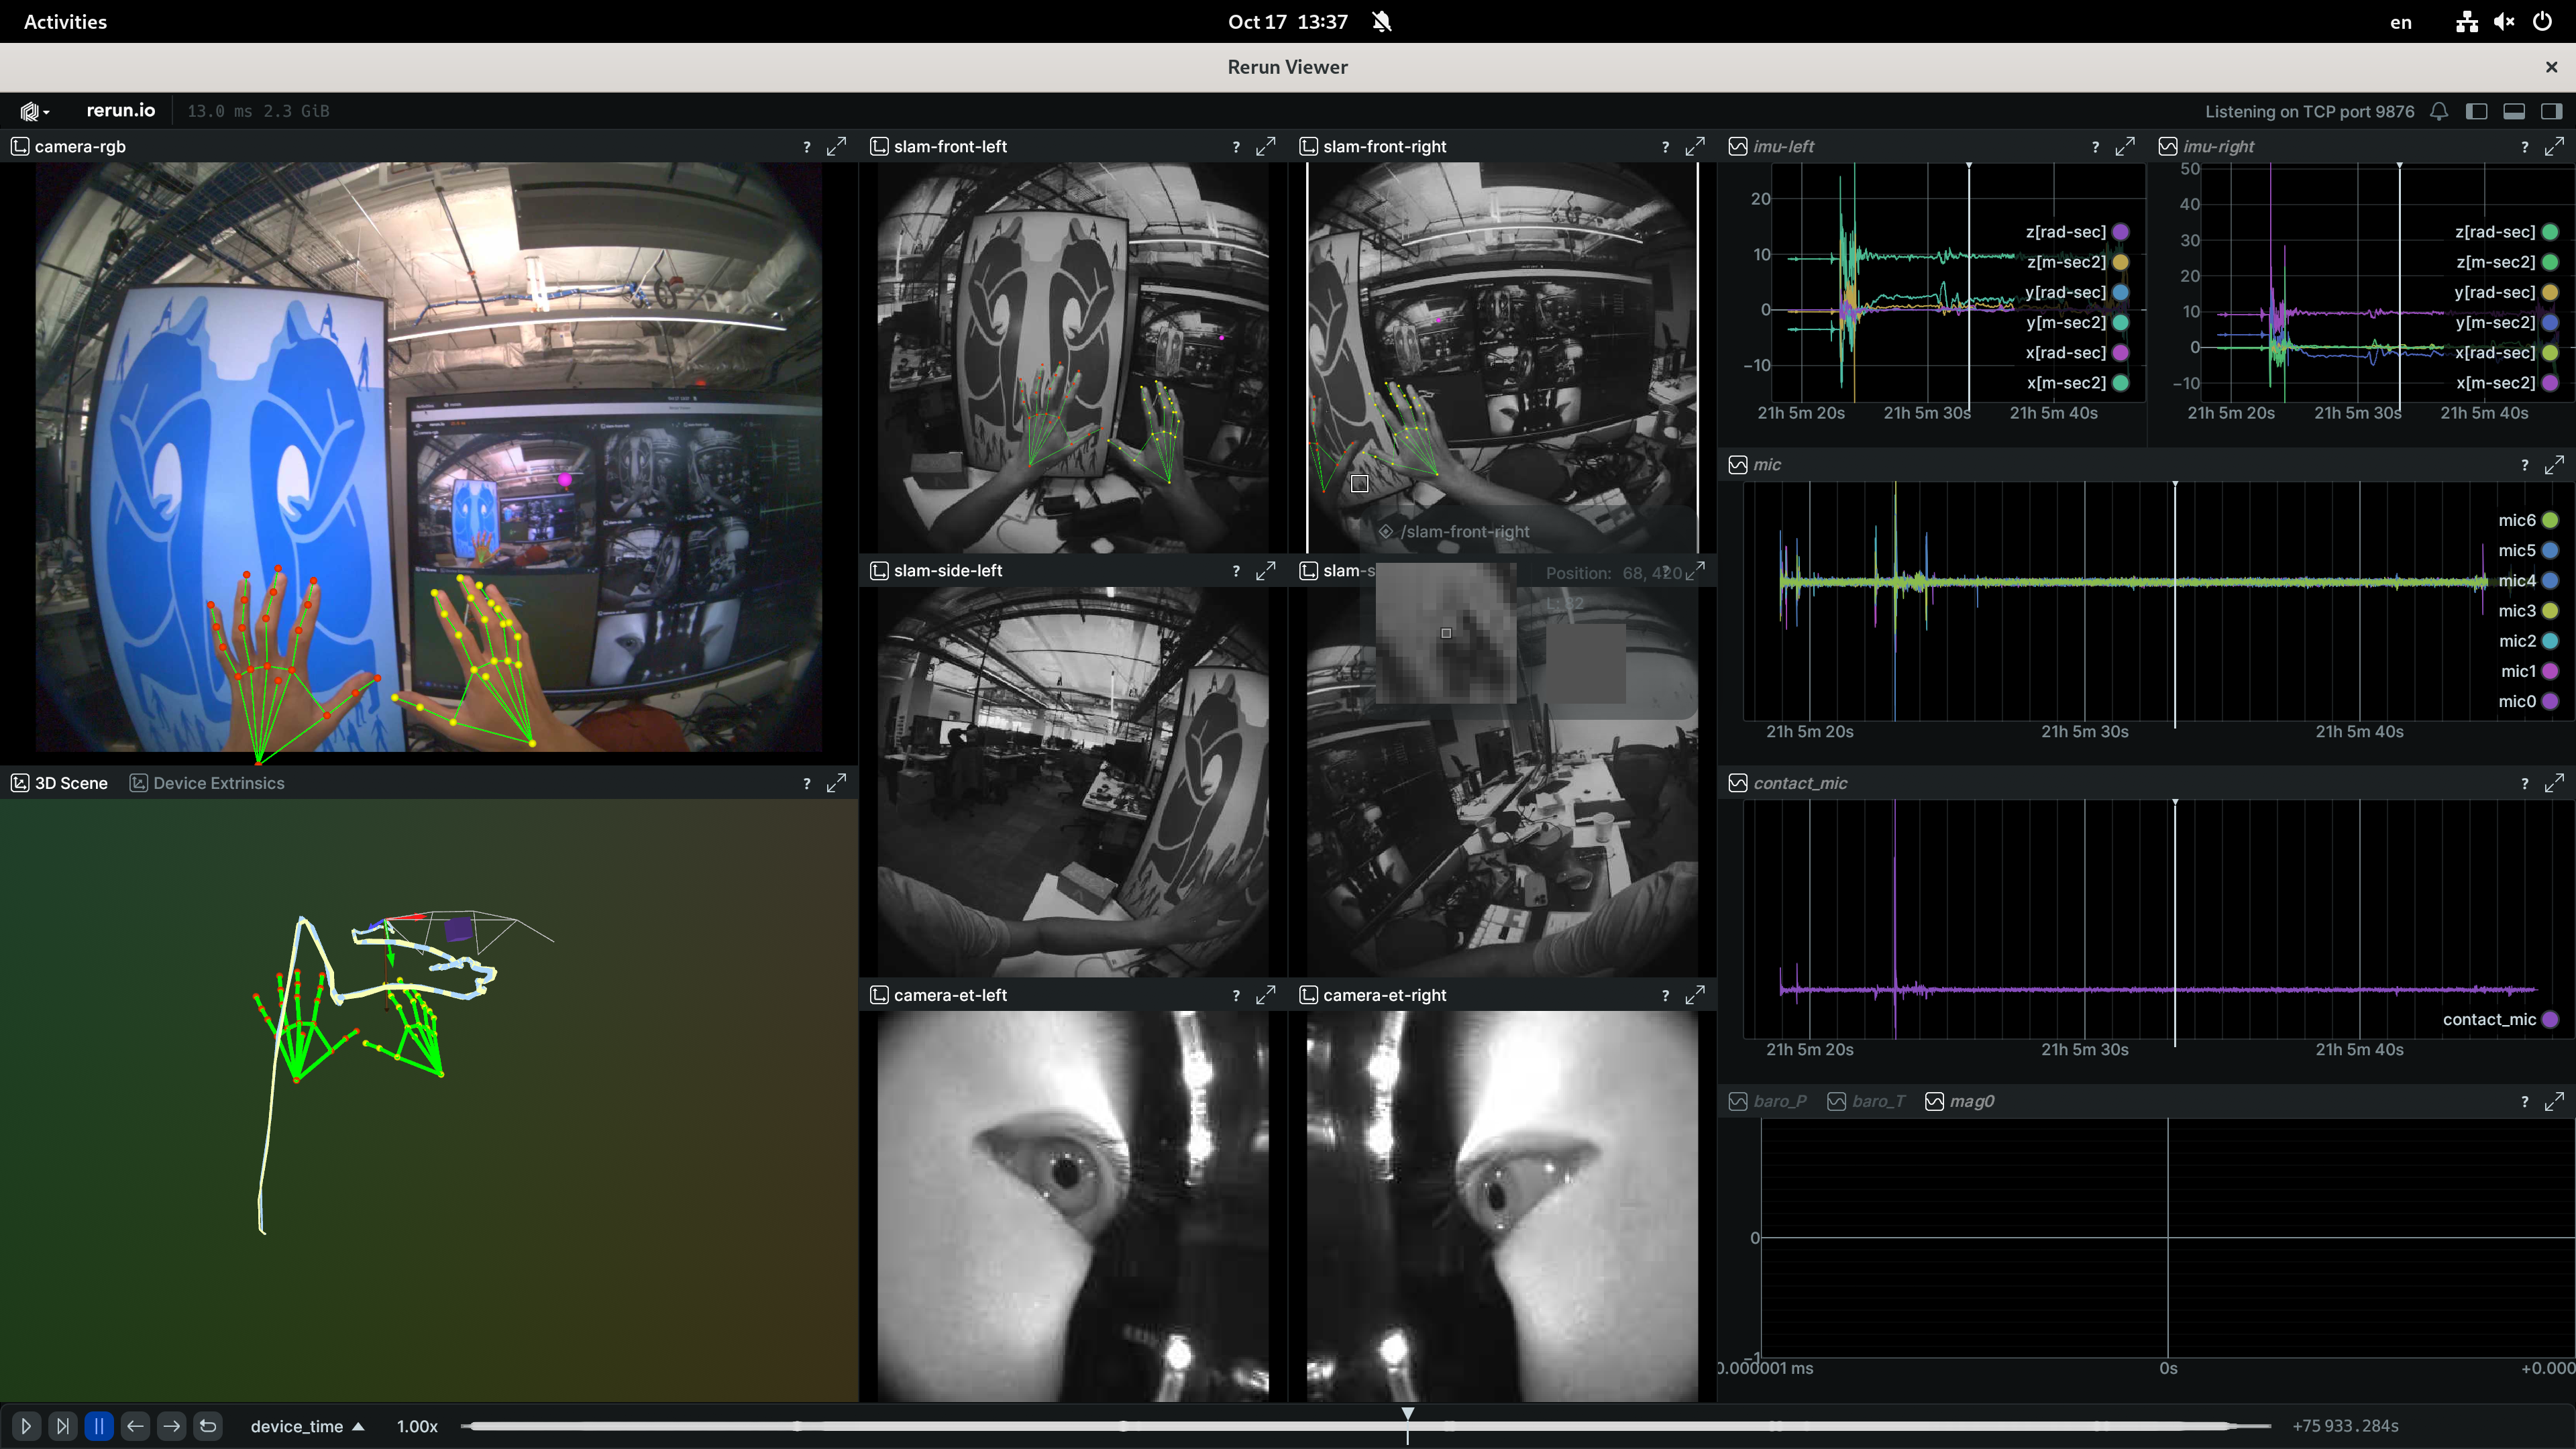
The viewer shows:
- Live camera feeds (RGB, SLAM, eye tracking)
- Machine perception data (VIO trajectory, eye gaze, hand pose)
- Sensor readings (IMU, magnetometer, etc.)
- Performance metrics (frame rates, latency)
Example Visualization
Streaming vs Recording
Choose the right tool for your needs:
| Feature | Streaming | Recording |
|---|---|---|
| Real-time Access | Yes | No |
| Data Saved on Device | No | Yes |
| Machine Perception | VIO, Eye Gaze, Hand Pose | VIO, Eye Gaze, Hand Pose |
| Connection Required | During capture | No |
| Use Case | Live monitoring, real-time processing | Data collection for offline analysis |
| Best For | Development, live demos, debugging | Research data collection, post-processing |
- Use streaming when you need to see data in real-time or process it live
- Use recording when you need to save data for later analysis or offline processing
Best Practices
Choosing the Right Method
- Development & Testing: Use USB streaming for reliability and ease
- Demos & Monitoring: Use USB streaming with long cables for mobility during short sessions
- Field Work: Use hotspot streaming when no network is available
- Long Sessions: Always use USB streaming (no thermal concerns)
General Tips
- Start Simple: Begin with USB streaming to verify everything works
- Test First: Run a short streaming session before important captures
- Monitor Temperature: Watch for device heating during wireless streaming
- Keep Device Charged: Wireless streaming consumes more battery
- Close Applications: Free up system resources for better performance
- Use Quality Cables: USB 3.0+ cables for best USB streaming performance
Thermal Management
- If device gets hot: Stop streaming and let it cool before continuing
- Extended sessions: Always prefer USB streaming
Next Steps
- Learn about Recording to save data for offline analysis
- Check out Streaming Examples to build custom streaming applications
- Visit the CLI Technical Specs for complete command reference