Line Detector
Description
Many computer vision tasks utilize edges and line segments detected in images, for tasks such as vanishing point estimation, scene parsing, structure from motion in feature-poor environments, and many others.
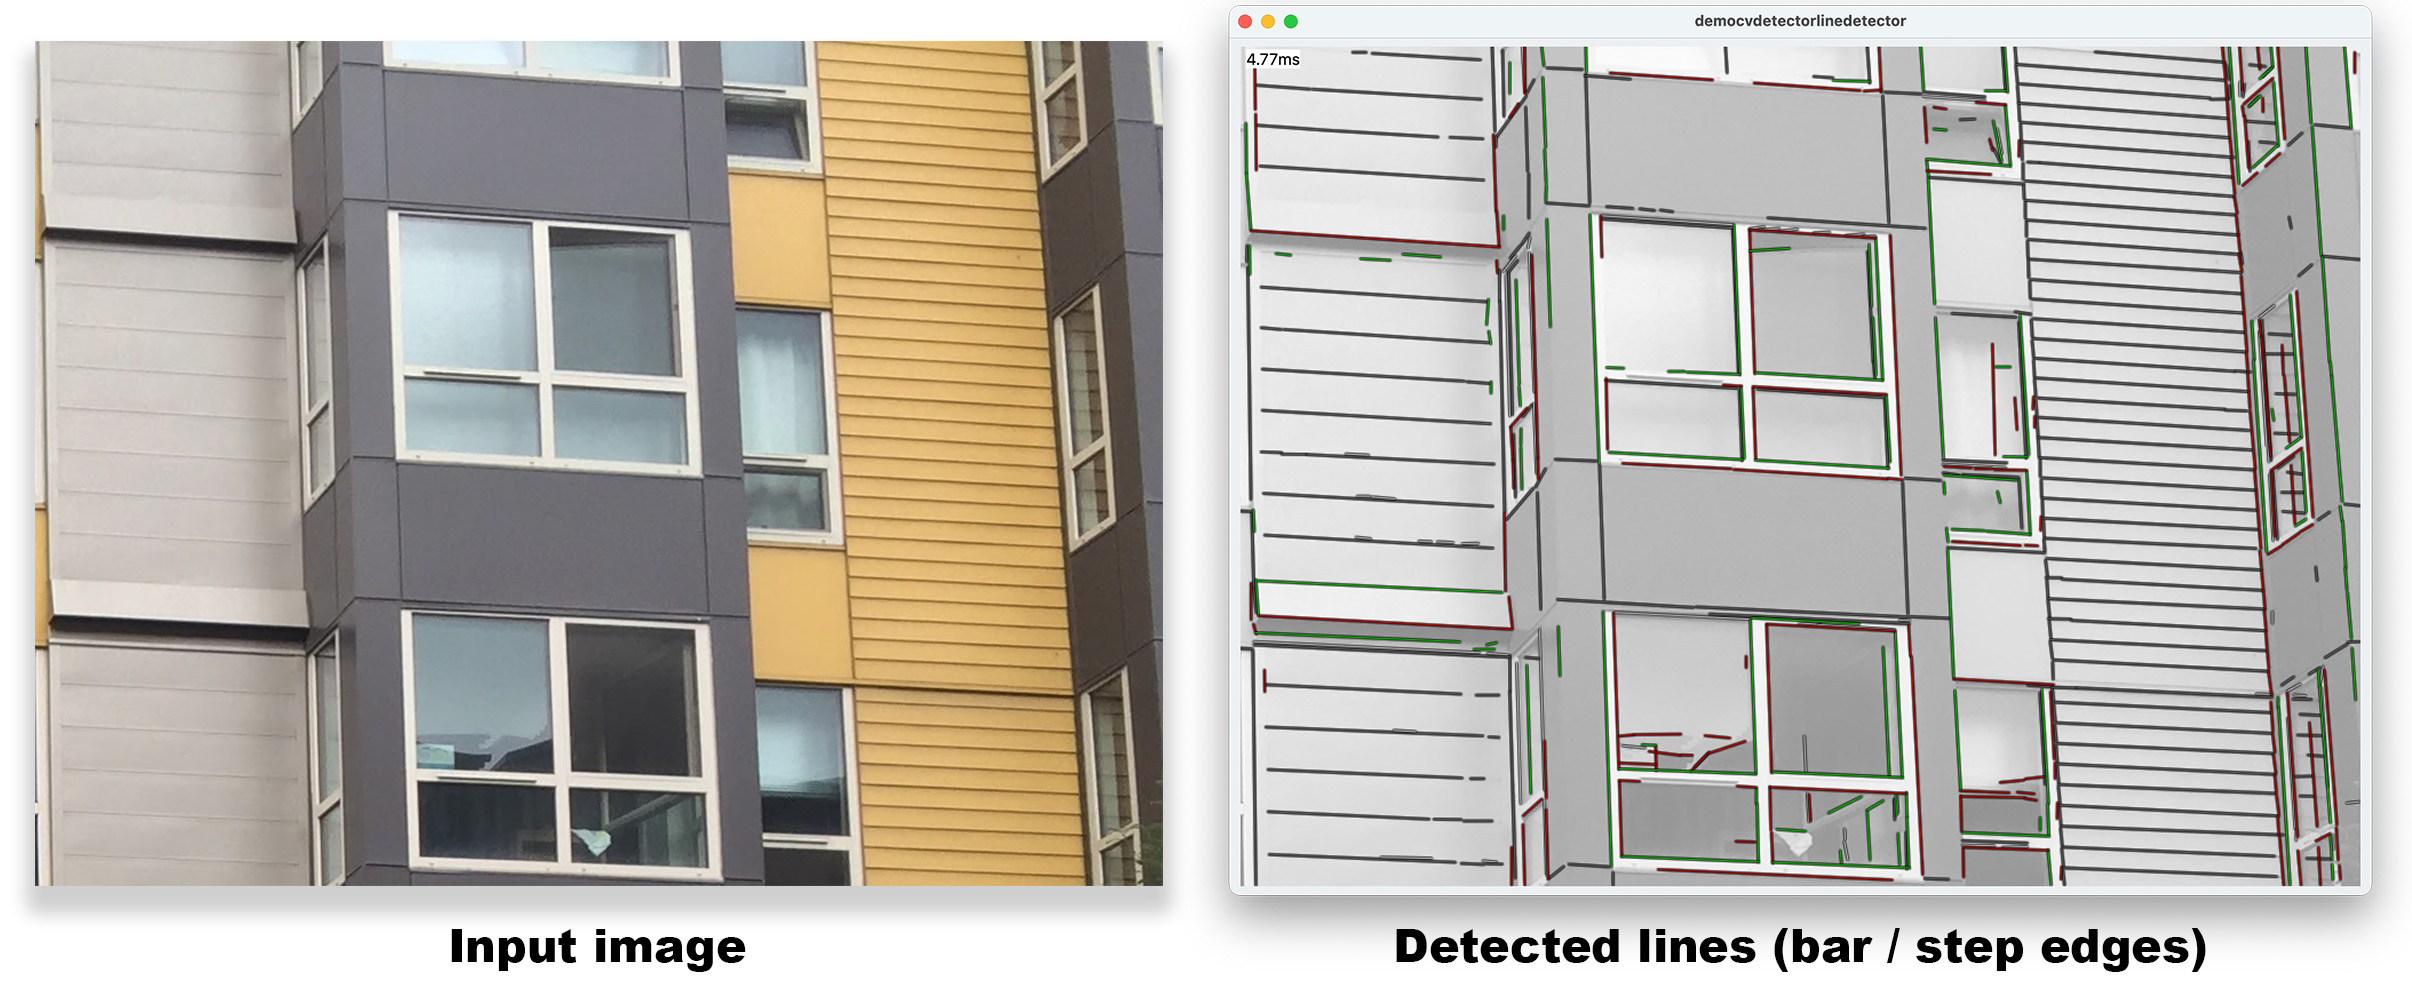
The LineDetector demo app showcases the capabilities of Ocean in detecting lines across various environments, particularly in urban settings.

Platform Independence
The LineDetector demo app is versatile and platform-independent, making it accessible on a wide range of devices including iOS, Android, Windows, and macOS.
Core Functionality
At the heart of the LineDetector demo app is the LineDetectorWrapper class.
This class is allows processing the input from various frame mediums such as static images, webcams, movies, or built-in cameras on phones.
Default Detection Method: ULFLineDetector
By default, the app employs the ULFLineDetector (Urban Line Finder), which is specifically tailored for detecting straight lines in urban landscapes. The ULFLineDetector operates in two main phases:
- Edge Detection: Initially, the algorithm identifies all pixels that belong to edges within the image, including "step edges" and "bar edges".
- Line Formation: Subsequently, consecutive edge pixels of the same type are aggregated to form straight line segments.
Most existing edge and line detectors are designed to detect "step edges" in intensity, i.e., locations where the intensity differs on both sides of the edge. In urban scenes, however, "bar edges" are equally prevalent, i.e., thin lines whose intensity differs from the constant surrounding intensity (e.g., cracks between surface tiles, window grids, or wires in the sky). Existing edge and line detectors often fail to detect such edges, or yield a double response.
In contrast, ULF is designed to detect both bar edges and step edges. The algorithm makes a horizontal and a vertical pass over the image. In each pass it detects evidence for bar edges and step edges in the scanning direction, and then groups detected points into lines in the orthogonal direction. The method runs approximately 3 times as fast as OpenCV's popular LSD detector and finds lines in urban and indoor scenes more reliably.
The ULFLineDetector is equipped with multiple edge detectors, each offering a balance between performance and accuracy. This allows users to choose an edge detector that best fits their needs.
In its default setting, the demo app executes a step edge detector and a bar edge detector. The detected lines are then visualized using a color coding indicating the type of edge detected: red/green for positive/negative step edges, and white/gray for positive/negative bar edges.
Alternative Detection Technique: Hough Line Detector
For users interested in exploring different line detection methodologies, the demo app also includes the Hough line detector.
By leveraging the USE_ULF_DETECTOR macro, users can easily switch between the ULFLineDetector and the Hough line detector.
Explore and Experiment
The LineDetector demo app is designed for developers, researchers, and enthusiasts to explore line detection technologies. Users can experiment with the app's features by adjusting parameters and testing different ULF edge detectors to see how changes affect line detection results. This flexibility allows for a hands-on approach to understanding and optimizing performance. Users are also encouraged to develop their own enhancements and contribute to the broader Ocean community.
Building
- Android
- iOS
- macOS
Ensure the third-party libraries have been built for Android for all of the required Android ABIs. Let's assume the base location for third-party libraries is ${HOME}/install_ocean_thirdparty, i.e., the Android versions will be located in ${HOME}/install_ocean_thirdparty/android_${ANDROID_ABI}....
# Define this so that Gradle (and CMake) can find the third-party libraries.
export OCEAN_THIRDPARTY_PATH="${HOME}/install_ocean_thirdparty"

# Change into the directory with the Gradle config of this project
cd /path/to/ocean/build/gradle/application/ocean/demo/cv/detector/linedetector/android

# In ./app/build.gradle.kts, ensure that only those Android ABIs are enabled for which the corresponding third-party libraries have been built. Otherwise, your build will fail, cf. the [general build instructions](https://github.com/facebookresearch/ocean/blob/v1.0.0/building_for_android.md#4-building-the-ocean-android-demotest-apps).

# Build the debug and release APK of this
./gradlew assemble

# Install the desired APK
adb install app/build/outputs/apk/debug/app-debug.apk
adb install app/build/outputs/apk/release/app-release.apk
By default, the log output will be displayed on the screen of the phone as well as in the Android logs, which can be displayed using:
adb logcat -s Ocean
Ensure the third-party libraries have been built for iOS. Then follow the general setup for building iOS apps using XCode. Once the generation of the XCode project is complete, open it and search for application_ocean_demo_cv_detector_linedetector_ios in the scheme at the top. Then hit CMD-R to build, install, and run the app and follow the instructions.
Ensure the third-party libraries have been built for macOS. Then follow the instructions to build the Ocean code base. Let's assume you're building Ocean with the release build config:
cd /path/to/ocean

# Build the third-party libraries
./build/cmake/build_thirdparty_linuxunix.sh -c release -l static -b "${HOME}/build_ocean_thirdparty" -i "${HOME}/install_ocean_thirdparty"

# Build and install Ocean
./build/cmake/build_ocean.sh -c release -l static -b "${HOME}/build_ocean" -i "${HOME}/install_ocean" -t "${HOME}/install_ocean_thirdparty"

# Execute the demo app (a bundle)
open ${HOME}/install_ocean/macos/arm64_static_release/bin/application_ocean_demo_cv_detector_linedetector_osx.app
Alternatively, generate a XCode project for Ocean and search for application_ocean_demo_cv_detector_linedetector_osx in the schemes at the top. Then hit CMD-R to build and run the app.